Sunday, February 12, 2012

Building carbon fiber tubes... How I did it...

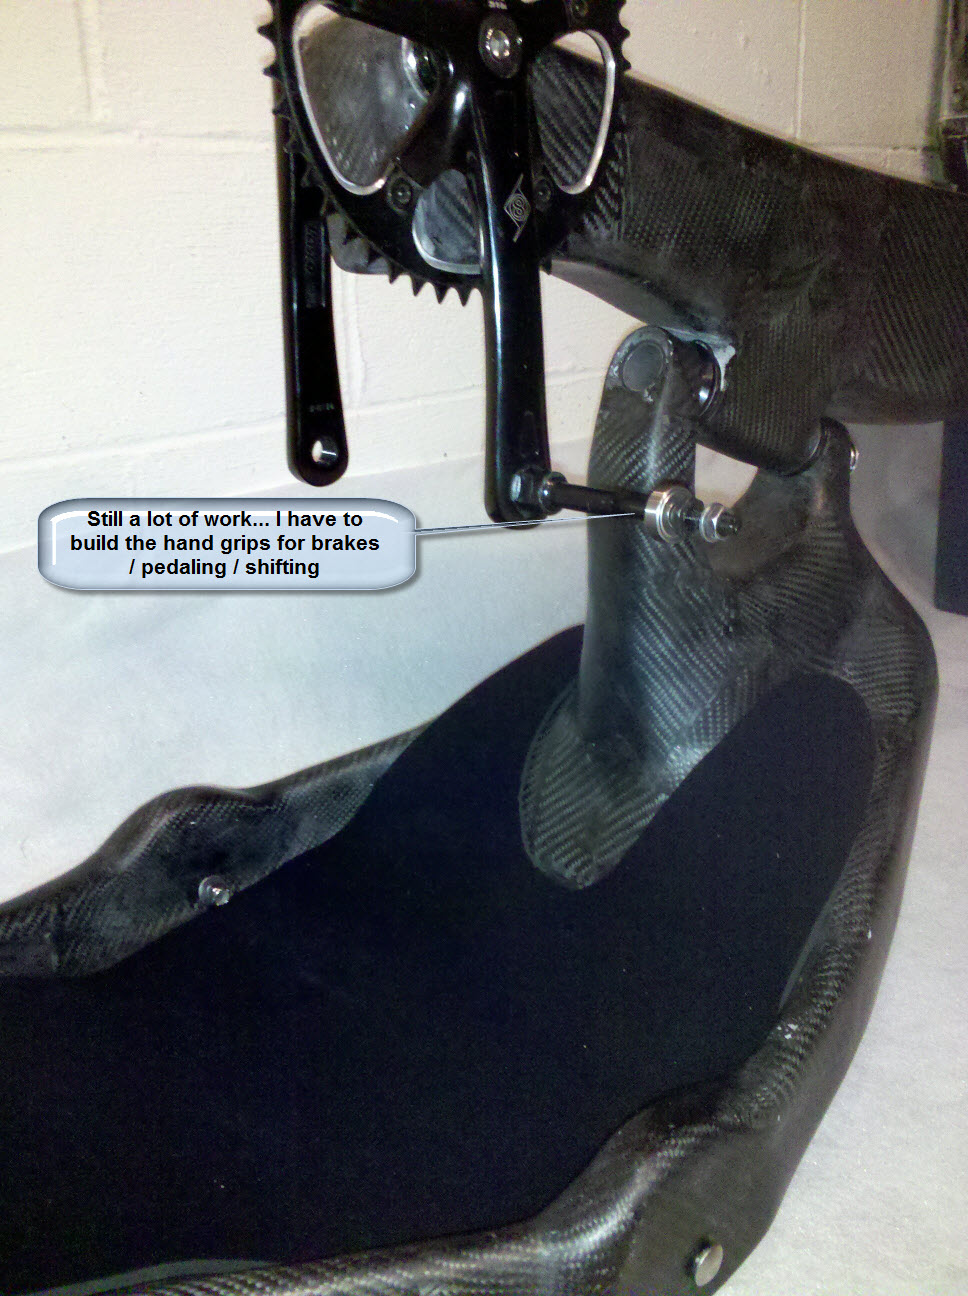
The handcycle requires quite a few tubes for the steering and hand grips (pedals).  My initial method failed, but the next attempts worked out quite well.  Now, it is almost second nature for which I can build in tube in literally a few minutes.


Carbon fiber tubes can be purchased online.  They are usually quite expensive.  The larger tubes are often quite long (50", 60" for instance).  Well, I don't need the length -- nor the expense.  Usually, I just need a few inches of tube.


Here are some of the supplies:

(Do note that may plastic pipes are not "round".  Therefore, I would not use plastic pipe as a mandrel for longer tubes)

I select a pipe or tube (whatever I can find) that matches the inside diameter of the tube that I am constructing out of carbon fiber.  That is my mandrel. The steps:

  • Put a light coating of grease (or mold release) on the mandrel/pipe that represents the inside diameter of your new tube.
  • Wrap the mandrel in plastic food wrap to cover the grease.  I have not tried it with mold release agent, but that may work.  If the tube is long (8" tube is my longest), then the twisting the new carbon fiber tube off the mandrel takes some elbow power. For me, the grease worked very well as compared to other agents.
  • Calculate the thickness of tube that you desire.  I usually figure 10 to 15 layers.  Therefore the outside diameter is adjusted by 20-30 layers of carbon fiber.  Depending upon the thickness of the carbon fiber, then outside diameter will be approximately 1/4" (or more) greater than the inside diameter.  I usually figure a layer of carbon fiber with epoxy at 0.015" of thickness for the 5.8 ounce fabric.
  • Wet down the carbon fiber.  I usually do this on a flat sheet covered with a piece of plastic sheet.  The plastic sheet is throwaway after using it a number of times.
  • Wrap the mandrel with the carbon fiber.  As I wrapped the carbon fiber I pull the mandrel back while holding the other end of the carbon fiber stationary -- thus tightening the wrap.  This works very well in causing a tight rolling of the carbon fiber on the mandrel.
  • Wrap the finished carbon fiber in peel-ply -- in the same direction as the rolling of the carbon fiber.  After the peel-ply is fully wrapped around the carbon fiber covered mandrel, keep pushing the peel-ply around with the hands while twisting the mandrel in the opposite direction. This will keep tightening down the carbon fiber.  The excess epoxy will start leaking out in quantity.  I was quite surprised at how well this worked in removing excess resin and causing a tight compression of carbon fiber.

  • After the epoxy cures (I usually wait about 6-7 hours with the 205 Fast Hardener), twist the tube off the mandrel with your hands.  It takes some elbow grease for longer tubes. After the initial movement of the tube on the mandrel, the tube will twist off more easily.  Sometimes initiating the movement is difficult.
Here is the results of one group of tubes (the ends of which will be cut off):



Thursday, February 9, 2012

Self-Centering Steering - Finally a good design


Steering is an important consideration.  When I come to a stop, I may need to put both hands down in order to balance and push the handcycle with my hands.  Of course, if my hands are taken off the steering, the steering could flop to one side or another.  Therefore, I need a self-centering steering -- no hands involved.

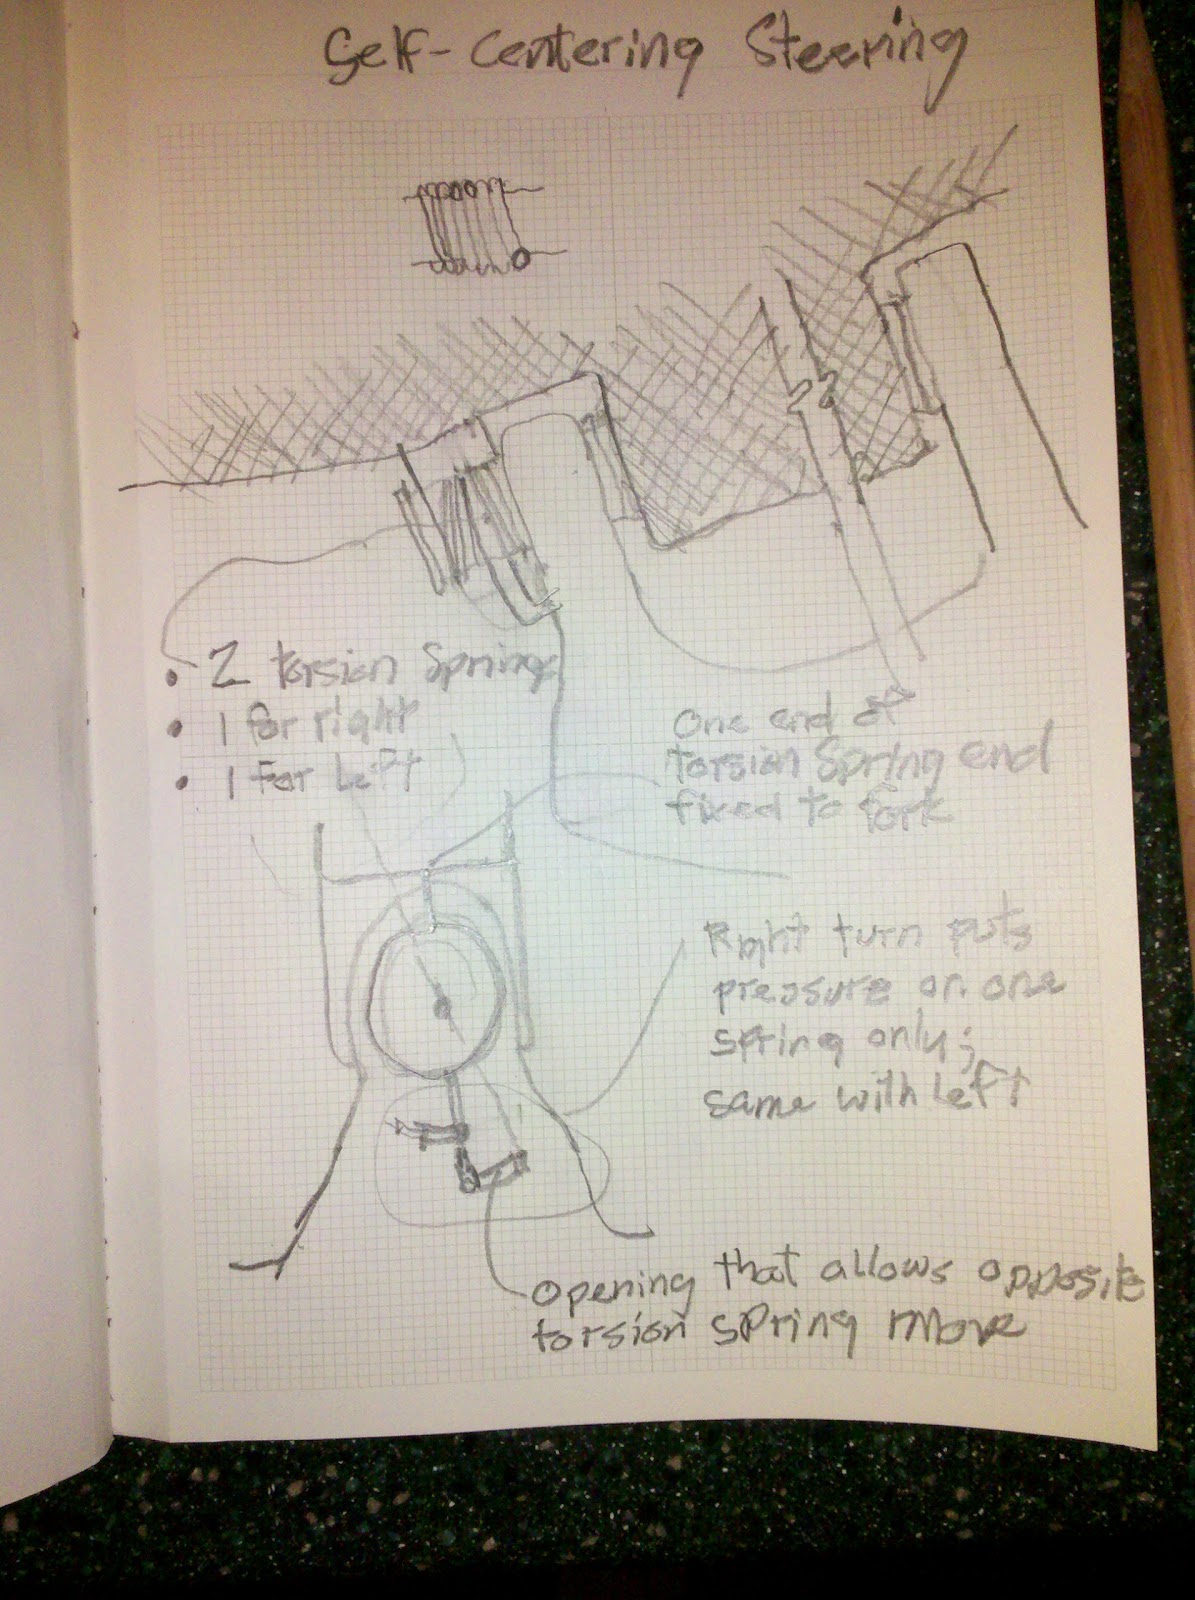
I believe I have a design for it.  It will require two torsion springs (a mouse trap has a torsion spring).  Why two springs?  A torsion spring only works in one direction.  It should not go back past the zero spot.  That is, a torsion spring should not be torque in the opposite direction from which it was built for.  Yes, it will go back to "zero", but over time the spring may break if used in the wrong direction.  A spring can be a left or a right-hand spring.

The design that I have come up with requires two torsion springs -- one for right-hand turns and one for left-hand turns.  The opposite spring would stay in the zero position throughout the other's torsion.

The springs can be built from piano wire or stainless (or other material),  These would use stainless.

The steering needs very few degrees of movement.  I still need to determine the amount.  But I suspect it is less than ten degrees.

The springs need a mandrel.  In this case, the perfect mandrel is the steerer tube.  The steerer tube will be extended toward the wheel.  Of course the benefit of this is that the center of the turn is the center of the steerer tube.  One end of each spring will fit into a hole in the bottom of the fork.  As the fork turns around the steerer tube, the spring end would move accordingly around its center -- the center of the mandrel (the steerer tube).  The other ends of the springs would be allowed to move in one direction only through slots in the base of the carbon fiber.  (See picture below.)  The right spring for the right turn would add torsion while the left spring stays in neutral (and vice versa).. Perfect...

The diameter of the stainless wire used to build the spring will impart the number of foot-lbs per degree of swing.  It is additive in that the further the rotation of the spring end, the greater the force.  This is exactly what I want.

Wheel-building


The rims and spokes came in. Well, one rim did not, but the store was kind enough to find the same back-ordered rim locally.  So I commenced the building of the wheels.  I have not built one for about 25 years.  This time it was much easier.  The rims appear to be truer and the spokes and nipples seem to work in tandem much better than the "old days."

BTW, Sheldon Brown's "Wheel Building" tutorial is great.  As a side note, if you do any work in bike design. Sheldon Brown gathered endless amounts of data on the various standards and dimensions of bike building.

The rims are Velocity Deep-V 700c.  The drive (front) wheel has 36 spokes and the non-drive (rear) wheel has 32 spokes.  I used a spoke calculator in order to determine the four different sizes of spokes required for the 3-cross pattern.  Left and right sides of both wheels require different lengths of spokes.

Why Velocity Deep-V rims?  Deep rims are better aerodynamically.  But these are not even close to deep enough to make a difference. About 80mm of depth is required.  I would say these may have 40mm of depth.  So, I like the name I guess...


What next?
Some of the parts I ordered for the hand grips that I am constructing will not arrive until next week.  After I have the hand grips (like a cyclist's pedals) completed, I will be able to test the bike.

Monday, February 6, 2012

Current views after extensive sanding

These pictures are after extensive sanding -- literally to point of wearing through the skin on the finger tips. Now I am smart enough to tape my fingers.  When sanding, one can feel and hear the degree of smoothness of the surface quite well even with the fingers taped.  The resonance changes as the surface gets smoother.  As well the sandpaper moves faster with a smoother surface.  When sanding with the wet paper (320 and above in my case), I know when a surface area is done with that particular grit by how well the paper slides.  

Sandpaper -- I never use a coarser paper than 150 grit.  150 grit will take off a surface pretty quickly.  The progression - 150 (dry), 320 (wet), 600 (wet), 1000 (wet) and 2000 (wet).  I have only made it to 320 grit predominantly -- but to 600 grit in some places. As a note though, West System's specifies that a cured epoxy surface be roughed up with 80 grit paper before adding another layer of carbon fiber

For 150 grit, the 3M dry sandpaper (the purple stuff) is unbelievable.  You can buy 1 sheet of that or 10 of the regular paper.  It is literally that good.  The 3M product allows you to not have to change paper often which makes the sanding a bit more pleasurable.


The above picture shows a 4mm neoprene with a nylon layer on both sides.  I like the material in that it stretches and I cannot put a hole through it easily. Hopefully it will be comfortable.  This will be tacked in place with spray adhesive after the finish is complete.


Tuesday, January 31, 2012

Adding the "training" wheels...

Remember when you were a kid and you had training wheels on your bike...
That is what I have now... training wheels


The problem is, I do not deflect the bike enough with my weight to keep the angle rather small.  After weighting the bike down with 200 lbs last week and recording the deflection, I decided to increase the amount of carbon fiber on the side rails.  The purpose was to decrease the deflection (35mm).  Well it worked so well that the bike deflects between 12 and 15mm with my weight. That keeps my training wheels higher off the ground. Thus the angle of lean for the bike in order for the training wheels to hit the ground is a bit steeper in feel than I expected.  The calculation:


I designed the wheel housing so that I can take up to 110mm wheels.  So I will go to bigger training wheels -- initially anyway.


As a side-note: The chain-line is lllloooooonnnnnggggg:


Monday, January 30, 2012

Making it look better...Adding a fixed chain-tensioner

Since I am working more on the finishing the handcycle, I have decided to lift the "pride factor" a bit and attempt to get the finish closer to what I may conclude with.  Therefore, I have filled in the small voids, pinholes, wrinkles, and areas of carbon fiber for which the peel ply was not in proper contact. In other words, I am trying to make the product look better albeit, what ever I do will have no consequence on strength.

The first mistake I made was using a low-quality (hear "cheap") paint brush.  I spent more time removing bristles from the resin finish than I did brushing on the resin.  So, I picked up a more expensive brush (about 30 times the cost of the cheap one).  This was not a throw-away brush.  Therefore, per Jakob's suggestions on saving a brush from hardening epoxy, I built a "bush-saver".  It works beautifully.  An no fumes escape to speak of.

Here is the result of a single coat of West System's 105 resin with 205 Fast Hardener:

With the foot holders attached to the fork and the fork attached to the base:

My front hub -- the I-Motion 9-speed from SRAM -- has a single cog.  I may change that cog out and therefore, the chain length may change.  On a regular bike, the derailleur's tensioner takes care of the chain tension when one shifts and changes cogs.  In my case, my hub's internal gears take care of gearing with the exception that I may decide to change the single exterior cog.  I may use a 17 tooth cog when I ride around Westerville and flat areas.  I may go to 19 tooth cog when I will be completing big climbs (e.g. New York's Gran Fondo and central Ohio's Reysnolds Hill).  Therefore I added a fixed idler/tensioner to the fork:


Wednesday, January 25, 2012

A handcycle pumping iron... Putting weights on the bike

OK, now the scary part... But I gotta do it.  I am going to add weight to the bike to see if it creaks and cracks -- but especially to see how much deflection there is.  I weigh in at 193 lbs.  I will be adding up to 200 lbs of iron to the bike.  I should probably add about 400 lbs -- but I am not quite ready for that (mentally speaking that is).

I have used the fast-hardener on most of the bike and therefore, can expect the bike to be near full strength.

Here we go... Got some weights and a tape measure...

90mm off the floor with 0 lbs. of weight applied:

...Drop of 10 mm at 70 lbs added
...Drop of 15 mm at 120 lbs added


...Drop of 25 mm at 160 lbs added
...Drop of 35mm at 200 lbs added

I have not completed any calculation nor have any real expectations of what I should have expected relative to deflection. After hitting 200 pounds,  the whole bike shifted and the weights fell off the bike.  There was no damage to the bike and it sprung right back to the original 0 lbs./90mm clearance.  That is a somewhat good sign I guess -- at least better than the alternative!