Sunday, December 30, 2012

Change to the Handcyle's Tail and Power Calculations

Aerodynamics and a Tail


One interesting aspect of aerodynamics shapes is that the tail shape can be as important as the frontal shape.  For instance, a square plate moving through air has less aerodynamic efficiency (Cd -- Coefficiet of drag) as compared to the same size square plate with a long tail.


I decided to add a more efficient tail to the handcycle.  Of course I am guessing that the shape I produce for the tail, is indeed more efficient as compared to not adding the shape.  I could be wrong!  For my bike, the tail is relatively short and therefore, the tail will not reduce drag very much as compared to a recumbent bike with a tailbox.  Here is an example of an efficient tailbox:
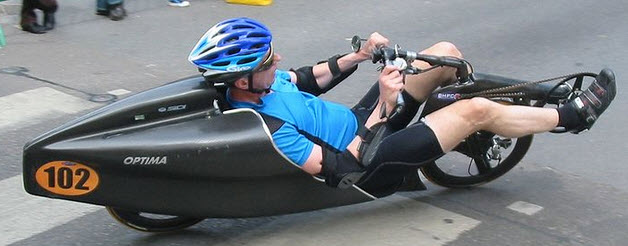


Since my ams are moving, I cannot build something as efficient as above and my interest is not in doing so.  

On the otherhand, a $150 TT (time trial) helmet could save me 4 seconds per 40K...


Or $10-$15 worth of carbon fiber may save me more... Here is the tail before trimming the trailing edge:

After - New Tail - Side View
After - Top/Rear tail View
I added the tail shape by crafting a few pieces of the pink foam board.  The foam took a number of hours to shape with the wire cutter, band saw, and 80 grit sandpaper.  The foam was fitted to the existing frame with 3M's 77 spray adhesive and then covered in carbon fiber.

Before Tail added

Design, Power and Speed

A friend and I rode together -- he on a very nice road bike and I rode on a 3-wheeled handcycle.  We maintained just about 20mph over a 20 mile ride.  I was pushing quite hard.  He had a power meter that kept the stats for the duration of the ride.  At the end of the ride, he found that he averaged just over 200 watts output for the duration.  Of course, I wondered what my power output averaged.  There is a site that does calculations based upon SRM Power Measuring Cranks.  There is no 3-wheeled recumbent bikes listed, but I presume that I had a very similar power output to a racing bike due to my 3-wheels.  

This raises a question -- what do I expect for speed with the new bike at a reduced wattage of output (I cannot hold 200 watts for 5 or 6 hours)?  The calculator's result for a lowracer:

If this bike can achieve 22.3 mph average (and 19.5 mph on a 0.5% grade) with my power output at 160 watts, I will indeed by happy with the results.

BTW, by choosing the "Lowracer with streaming tailbox" type of recumbent on the calculator, the speed increases to 23.3 mph.  Since my tail is much shorter, I would expect only a percentage of that increase in speed as compared to not having a tail. That still calculates out to about 20-40 seconds deduction over 40K.  Not bad if it holds true!

Finished Front Fork Views

The front fork is finished -- well almost.  I still have to cutout the dropouts on the added layers and re-drill the holes for the disc brakes. Otherwise...

The front fork has the two finish coats of West Systems epoxy over the many layers of carbon fiber. To this, I added four final coats of a polyurethane (with UV protection).  There was a lot of sanding in between all but the final coats of polyurethane.  While the end result is not perfect, I am relatively pleased with the look.  Daylight may change my mind! 

(There are black covers over the headsets in order that they did not received the urethane.)


I personally do not mind seeing the interweaving of various layers and direction of carbon fiber.  This is the way that the carbon fiber is laid up -- intermixing the direction of carbon fiber's grain through various layers.


Left Side of Fork

Right Side of Fork -- Displaying Chainline and Idler

The following picture -- from the rear of the fork -- is somewhat distorted due to the closeup of the camera. Notwithstanding, the picture does give an indication of the thickness of the fork down to the dropouts.


Rear of Fork 
Closeup of Idler in Fork


Tuesday, December 25, 2012

Somewhat Finished Fork

The fork is much closer to completion.  I have added a coat of epoxy over the last layer of carbon fiber.  This epoxy is still wet in the picture below.  BTW, I find that the epoxy brushes on much more easily with a small amount of acetone added to it.  This thins the epoxy for brushing -- but acetone evaporates very quickly.  So if one attempts to brush the epoxy too much, one will find it to thicken within just a few brush strokes.  From what I read on West Systems epoxy, this seems acceptable for a finish.

Front Fork -- with a finish coat of epoxy.


As you might remember, I had said that I would probably finish the bike with paint and not take the time to get a nice finish on the carbon fiber.  But, carbon fiber has an attraction -- and maybe this is the lipstick on a pig.  


I will shoot some more pictures that display the idler on the drive side as well as the fork thickness at a later point  -- the epoxy is curing!

Tuesday, December 18, 2012

New Handcycle Design

The winter is here and I needed a winter project. This is especially true since I overworked tendons in both elbows with the training over the last year and thus require a rest.  I had established a goal to set the course record for the Air Force Marathon in September (I did accomplish that).  But the heavy training -- 200 to 300 miles per week -- starting last March took a toll. The tendons were getting increasingly sore as the training continued, but I felt that if I took extensive time off from training, I could not meet that goal.  Now I am taking the time off to heal (and it is a VERY slow process) and filling the time with the design and building of another 2-wheeled handcycle.

My design objectives have not changed much from my original handcycle design:

  • Build a handcycle that can be balanced.  My first handcycle design had a trail that fell well out of the normal range for today’s 2-wheeled bikes.  That was due to the very low angle of the front wheel’s headtube.  This bike has a Trail that is about 60mm and an headtube angle that is consistent with many of today's bikes.
  • Keep the base/sitting area low enough to the ground that I can use my hands to balance the bike at stops.
  •  2-wheeled.  If each wheel of a 3-wheeled handcycle is essentially equivalent to a “front” wheel of a regular bike (no protection), and if a bicycle’s front wheel requires 40 watts of power at 20mph (whereas a protected rear wheel may only require 5-15 watts), then the handcyclist must overcome a real disadvantage compared to a 2-wheeled bike. Rough math would predict that the 3-wheeled handcyclist must generate about 65 or more watts for wheel rotation at 20mph as compared to a 2-wheeler.  That is a lot.
  •   I have to lie down and cannot use a kneeler-type handcyle. So the design reflects this.
  • Paint it.  I am not going through the extra work for beautifying the carbon-fiber.  Of course, I can smooth out the carbon fiber with light weight body filler and then either paint it or put on one more layer of large pieces of carbon fiber.  But I will probably opt for the paint.

Newest desgin
·        Sweet-looking.  Hey, if I get to design it and build it, I may as well build something for which I like the looks!  Of course beauty is in the eye of the beholder.  One only a parent could love...
  • Transmission hub (I-Motion9) for gearing.  This somewhat simplifies the design and potentially gets rid chainline problems.

This design (above) is therefore quite different from the first handcyle (below).  

First Handcycle design I built...sans wheelcovers...


The leg-holders will be added after I position/fit myself to the bike.  The dummy in the design is fairly accurate to my size -- but by no means perfect. ...maybe better looking though. 

As you can see, the front wheel is a small one in order to accommodate the much-more-normal headtube angle.  Again, this headtube angle is much closer to that of a road bike as compared to my previous design/attempt.  A large 650 or 700 wheel would cause the steering and crank to completely obliterate my line-of-sight unless I lift the base.  By lifting the base, I would no longer have easy reach of the ground. Therefore, the small wheel...


The front wheel is a 451 (20” x 1.125”) and home-built since I am putting in a transmission hub.  The hub has 36 spoke holes.  

A number of features have percolated from this design. One is that my feet will be closer together and therefore -- hopefully -- I will be a bit more streamlined.  The small wheels of this design keeps the wheelbase shorter and therefore the weight of the frame lower.

Another design consideration -- Since I am maintaining front-wheel drive (rear wheel drive is a whole other topic) on the bike, I have a chainline that must be redirected on the return side in order to allow for the chain to go through the fork in a placement that still allows for the integrity of the fork.


For the transition from design/paper to a foam plug, I built a foam hot-wire cutter that can cut through a large block of foam (very large!).  The foam cutter is essentially built from a three-legged shelf for which the fourth leg is the hot wire.


The battery charger was from my last (and much smaller!) foam cutter design.

With this design, I attached a spring to the end of the nichrome wire.  This worked much better than I expected.  The nichrome wire never broke in all the cuts. Additionally, I used a router to sink a movable square into the table top in order to insure straight cuts.

To assist in cutting the foam according to design, I attached a paper outline (printed 1:1) of the base (or fork) to 2 sides of a large block of foam.  The foam was built up from 2" thick foam board -- the pink stuff from Home Depot. I employed 3M's 77 adhesive for holding the foam together.  The adhesive works quite well -- but be liberal with it.  The benefit of a spray adhesive is that during sanding through the adhesive, there is no problem.


The cutter worked very well in building the rough shape of the base and fork.  I then used a drywall sanding screen to add rounded edges.  Within a day, I had the foam plugs of the base and front fork pretty well completed.  When cutting the foam, I made a number of changes to the design as you can see below:

View from the rear of the bike


Fitting the foam together

Testing the headrest/base for fit


When building the foam plug, I decided to keep the whole base deeper than the design drawings.  Originally, the design drawings had a center tube.  I will use the additional depth/space for hydration bags when I remove the foam with acetone.

I attempted to concoct a filler for the dings and such of the foam plug. Others have used the foam crumbs from sanding in combination with white glue as a filler.  If you do this, you must water down the glue substantially since the glue is not very sandable otherwise. 

Homemade foam filler -- Add water to glue!


From lessons learned, I covered as much of the foam plug with a layer of carbon fiber rather quickly. The last handcycle's foam plug I built got dented and even broken after falling on it).  Addding the carbon fiber helped in stabilizing the foam.  

Wood form to hold handcylcle square and plumb
In order to align the foam plug -- before any carbon fiber is added -- I built a wood base/holder with 135mm front fork offset and 100mm offset for the rear wheel in the base. The wood base is absolutely mandatory in order to square and plumb the plug. If I did not construct this, I could be assured of having a bike that would not track properly.  Even with this wood base, I used a "laser" level that shot a light the length and height of the holder. 

Into the foam, I mounted front and rear dropouts cut from carbon fiber plate.  Two of the dropouts contained the disc brake holders.  With the dropouts in place, and with the wood base built for holding the plug square and plumb, I then applied a carbon fiber layer to much of the foam and drop outs to hold everything in place.

Adding dropouts into foam plug
Drawing Displaying Disc-Brake Bracket

This picture below displays the bottom bracket (with crank) as well as the idler in place.  The idler is taken from an old derailleur's return cage. The idler changes the chain’s return direction.

Bottom bracket

The next phase of work required that the headsets/steerer tube be built into the frame and fork.  I used AHeadset ZS (Zero Stack series) for a 2” headtube and 1.125” steerer tube. The total height of the headset configuration took more space than I initially estimated.  Therefore the design changed slightly in the front fork to accommodate the height.  The change in height of the foam ply was fairly easy to achieve by merely gluing on more foam and shaping it. 


In order to ensure that the headset would align properly, I install the headset parts in carbon fiber tube.  Each carbon fiber tube was sized to the component first (lower fork, base, upper fork). Then the tube for the base case epoxied in with ar carbon fiber layer to the base.  After that cured, I epoxied in the fork's upper and lower headset tubes -- with the steerer tube installed through all headsets. I used the laser level to plumb and level each part and the bike.  I then applied a layer of carbon fiber throughout the headset to hold all parts accurately in place.  After that cured and after a thorough check to ensure that the parts were properly positioned, I added many layers of carbon fiber.

With the headsets in place, I was then able to check out the chainline, disc brakes and steering:

Well, maybe not beautiful...

The disc brakes and headsets aligned very well – phewwww.

During the downtime as the fork's epoxy is curing, I add light-weight body filler to the base. I think I sand away 98% of what I apply... and then I do it again and again. I guess when I paint it, I will learn whether I performed a good finish job.

Lightweight body filler for smoothing out carbon fiber

The front fork requires quite of bit of work in order build out the thickness of the fork where it carries the majority of the stresses.  This will be the basis of a later update.

Front fork before the buildup of carbon fiber


Sunday, May 6, 2012

DIY Sports Drink and a 12-hr race


For those that want the headline: 194 miles over 12-hours of handcycling...

The best test for my DIY Sports drink is to take consume it on a long race.  Yesterday (May 5th) was the perfect test -- Calvin's Challenge -- for which many classes of cyclist (standard bikes, recumbents, HPV's, ellicpticals, and hancyles) compete in an array of races (50 mile TT, 100 mile TT, 6 hour , and 12 hour races).  My goal in training was to break the record in the 12-hour handcyling distance.  The stars have to be perfectly aligned in order that the weather is great (read: low wind speed) and that bike breakdowns are limited.  

If the stars are aligned, then one needs only fight bonking.  Bonking (sometimes called "hitting the wall") is the state of the body in which the liver and muscles are depleted of glycogen.  I have bonked may times over the years.  For those that have not bonked, the best way for me to describe it is to give you two examples.  When running a marathon years ago, I "hit the wall", for which I could walk 5 or 6 steps and then run 2 more steps. I just could not run more than 2 steps. Another example was when I cycled a 24-hour event.  About 20 hours into the race, I saw an arrow on the road to turn right on the next turn.  I stopped my bike and looked a the sign for what seemed like a minute in order to decide what direction the arrow called for.  You see, glycogen is required by the brain as well.  I just did not have enough left in my body in order to make a simple, simple decision.

Well, yesterday, my DIY Sports Drink must have worked perfectly.  I never bonked; my decision-making was good; I seemed to have the energy pretty much on demand.  I broke the 12-hr record ( the record was 160.5 miles) by completing 194 miles.  Why not 200 miles?  Do the math -- 12 hours divided by 6 miles equals another 1/2 mile per hour of speed required. A half a mile per hour more does not seem like much, but it is a lot!

What changes have I made on the drink over the many (9) training rides that were in the century (100 miles) or above over the last 7 weeks?  Basically the complaints for sports drinks are in two categories -- stomach discomfort and taste. Let me hit those points:

Taste: Initially, I had used the KoolAide powder to add taste.  It did not work for me. Finally (and luckily) I decided to add nothing for taste. Perfect!  The maltodextrin (a poly-glucose) is somewhat sweet and its taste is -- or almost completely lack thereof -- is great.  It is literally the first time that I have been able consume a sports drink over this number of hours without wishing for another drink.  

Stomach discomfort:  Basically, I had near zero stomach discomfort.  Yes, I did have some gas, but it was in much smaller amounts than I expected.  A lunch with sauerkraut or beans is far worse. 

Due to some more studying, I have changed my formula a bit more.  Some of the studies call for a larger quantity of sodium. Since sodium is only 40% of the weight of salt (salt is comprised of sodium and potassium) I made some adjustments.  Additionally, I have have upped the percent of maltodextrin by weight.  In the future, I may increase both the salt and maltodextrin even more.

100 oz of water (3000 grams)
265 grams of maltodextrin
60 grams of protein whey
3000 mg of sodium (1 and 1/4 teaspoon of salt)
400 mg of caffeine ( a couple of 200mg tablets that easily dissolve)

(If I know the race day is to be hot -- 90's for instance -- I will increase the salt by another teaspoon full.)

This formula gives a nearly 10% formula of carbohydrates/protein to water by weight. That is high compared to many sports drinks.  The usual formulas call for 8% or less.  But many of the commercial drinks add fructose and/or sucrose (cheaper source of carbohydrates than maltodextrin).  Studies have shown that the stomach discomfort may well come from these simple sugars.  Therefore, I have stayed away from them. Additionally, the simple sugars have so many disadvantages including the insulin reaction and glucagen production.

The results speak for themselves... 194 miles in 12 hours of handcyling... the drink works! 

As one final note.  I did bonk four hours after the race.  I went to bed and started shivering probably from the lack of enough glycogen to keep my body warm.  I was not hungry after racing and therefore did not eat much... so I bonked four hours later.

Monday, April 2, 2012

Training, bonking... and DIY Sport Drink...


The handcycle record for 12 hours is 160 miles for the Calvin's Challenge.  I know I can break it if I could have the record attempt in August on a flat course. “Calvin’s Challenge” is a well-known  race for all types of leg powered (and hand-powered) vehicles from standard bikes, tandems, recumbents, faired recumbents, Human-Powered Vehicles (HPV) and even handcycles.  Participants come from the far reaches. And the course is pretty flat (315' up and 315' down over 50 miles).  It is but five weeks away.  So, I am training for it now and I must be ready for it in just weeks.  (I have a lot of work!)

I decided to attempt to train without consuming any carbohydrates – just water – in order to teach my muscle cells to use the fatty acids for energy at a greater percentage as compared to glycogen.  So Saturday’s 90 miler was my first long attempt at this.  I had finished two 60 milers the weekend before with just water.  No problem on those – but I also kept the speed down around 14.3 miles per hour over rolling terrain and it was warm.

This Saturday’s attempt was on pretty flat terrain – 1000’ up and 1000’ down – over 90 miles.  But I wanted to maintain at least 15.5 miles per hour.  For the first four hours, I felt really good.  I was averaging right around 16.5 mph with much of the speed in the 17-19 mph range.  A few long climbs (but not steep) pushed me down to the 14 mph range on the climbs.  All told, though, I felt pretty good – until I hit the wall hard that is.


One contributing factor for my bonk may have been temperature.  The afternoon was to be in the 50’s with sunshine.  Instead, I was caught in the mid-40’s with a fine mist in the air and under-dressed.  (Matter of fact, after getting home, it took a good two hours to get my body temperature back up).

 After hitting the wall – I went from averaging 16.5 mph to precipitously losing 0.1 miles per hour in what seemed like every few minutes – I finally stopped to get a milk shake in a small town with one stop light and the "Purple Monkey" eatery.
Purple Monkey -- I gotta try their pizza... maybe after Calvin's Challenge

It helped tremendously, and I regained speed pretty quickly.  Overall though, my average speed came down to 15.8 mph for basically 6 hours of cycling.  My recovery from hitting the wall was much longer (2 days) than if I had not bonked.  Much longer!  

DIY Sports Drinks:

From this, I started doing some research into sports drinks.  Usually I just use Pepsi (less fizz than Coke) since it has the caffeine, sodium, and carbohydrates.  It actually works very well.  But studies suggest that long-chained carbohydrates (as compared to fructose or sucrose) absorb at a quicker rate and can improve performance over simple sugars.  Additionally, the addition of protein to the drink may be valuable. The addition of protein appears to aid fluid retention. When a beverage is too dilute, it tends to pass quickly through the bloodstream to the bladder so it doesn't "water down" the blood and other body fluids. 

But I just hate giving away money for what are relatively inexpensive ingredients (Pepsi is pretty cheap) and I enjoy making my own stuff.  So, I ordered a 50 pound bag of maltodextrin (60 bucks).  I already have plenty of whey protein (fantastic for me relative to recovery from hard rides) and salt and water.  Caffeine is sold in tablet form and I can decide on how much to use.  I can also add cocoa or a fruit extract for taste.  Salt should give me plenty of sodium and potassium.  Anything other ingredient that the sports drinks may advertise as great enhancements appear to have no real science behind them.  Water, maltodextrin, protein, and salt…  One may vary the carbohydrate by adding some fructose, dextrose, or sucrose (I have to study that more).

Here is a link for a recipe. 

The 50lb bag of maltodextrin:

Orange Extract (I usually like orange):

I expect to change the recipe over time as I determine what works for me.  One of the more important aspects of digestibility is the concentration (or lack of it) of carbohydrates.  When the concentration of carbohydrates goes above 6%-8%, for many people, more severe gastrointestinal discomfort appear and absorption of the carbohydrates is actually reduced. So if you make your own sports drink, you might read the literature beforehand.

Here is one study:

This study is interesting relative to adding protein to the carbohydrate-based drink:

But a counter to this:

This study may remove some hesitation in using protein as part of the mix:

But then again, maybe protein itself does not cause an improvement as compared to carbohydrate only drink:

I drink a LOT of chocolate milk… And this study shows what I have personally found:

Why one might add protein, but not subtract carbohydrates in order to do so:

And a handcyling study:

Hopefully, I get the ingredients in this week so that I can test the DIY Sport Drink on Friday or Saturday with another 90 miler over the same course.  At least I will have a reference speed...(and a eatery if I bonk)...

Some more design work on the tilting rear wheels

March Madness gave me a bit of time to design the tilting rear wheels assembly (while listening to some games).  I found some commercially sold square carbon fiber tube that can work for building the left, center and right channels.  Additionally, I have found fittings that I can bolt my  rear wheels (from my existing handcycle) into. And finally, I have found the correct carbon fiber tube that will accommodate those fittings.  The 3D drawings are updated to detail the correct size of pipes, bearings, and square tubes.