Tuesday, January 31, 2012

Adding the "training" wheels...

Remember when you were a kid and you had training wheels on your bike...
That is what I have now... training wheels


The problem is, I do not deflect the bike enough with my weight to keep the angle rather small.  After weighting the bike down with 200 lbs last week and recording the deflection, I decided to increase the amount of carbon fiber on the side rails.  The purpose was to decrease the deflection (35mm).  Well it worked so well that the bike deflects between 12 and 15mm with my weight. That keeps my training wheels higher off the ground. Thus the angle of lean for the bike in order for the training wheels to hit the ground is a bit steeper in feel than I expected.  The calculation:


I designed the wheel housing so that I can take up to 110mm wheels.  So I will go to bigger training wheels -- initially anyway.


As a side-note: The chain-line is lllloooooonnnnnggggg:


Monday, January 30, 2012

Making it look better...Adding a fixed chain-tensioner

Since I am working more on the finishing the handcycle, I have decided to lift the "pride factor" a bit and attempt to get the finish closer to what I may conclude with.  Therefore, I have filled in the small voids, pinholes, wrinkles, and areas of carbon fiber for which the peel ply was not in proper contact. In other words, I am trying to make the product look better albeit, what ever I do will have no consequence on strength.

The first mistake I made was using a low-quality (hear "cheap") paint brush.  I spent more time removing bristles from the resin finish than I did brushing on the resin.  So, I picked up a more expensive brush (about 30 times the cost of the cheap one).  This was not a throw-away brush.  Therefore, per Jakob's suggestions on saving a brush from hardening epoxy, I built a "bush-saver".  It works beautifully.  An no fumes escape to speak of.

Here is the result of a single coat of West System's 105 resin with 205 Fast Hardener:

With the foot holders attached to the fork and the fork attached to the base:

My front hub -- the I-Motion 9-speed from SRAM -- has a single cog.  I may change that cog out and therefore, the chain length may change.  On a regular bike, the derailleur's tensioner takes care of the chain tension when one shifts and changes cogs.  In my case, my hub's internal gears take care of gearing with the exception that I may decide to change the single exterior cog.  I may use a 17 tooth cog when I ride around Westerville and flat areas.  I may go to 19 tooth cog when I will be completing big climbs (e.g. New York's Gran Fondo and central Ohio's Reysnolds Hill).  Therefore I added a fixed idler/tensioner to the fork:


Wednesday, January 25, 2012

A handcycle pumping iron... Putting weights on the bike

OK, now the scary part... But I gotta do it.  I am going to add weight to the bike to see if it creaks and cracks -- but especially to see how much deflection there is.  I weigh in at 193 lbs.  I will be adding up to 200 lbs of iron to the bike.  I should probably add about 400 lbs -- but I am not quite ready for that (mentally speaking that is).

I have used the fast-hardener on most of the bike and therefore, can expect the bike to be near full strength.

Here we go... Got some weights and a tape measure...

90mm off the floor with 0 lbs. of weight applied:

...Drop of 10 mm at 70 lbs added
...Drop of 15 mm at 120 lbs added


...Drop of 25 mm at 160 lbs added
...Drop of 35mm at 200 lbs added

I have not completed any calculation nor have any real expectations of what I should have expected relative to deflection. After hitting 200 pounds,  the whole bike shifted and the weights fell off the bike.  There was no damage to the bike and it sprung right back to the original 0 lbs./90mm clearance.  That is a somewhat good sign I guess -- at least better than the alternative!

Tuesday, January 24, 2012

The small stuff...

The foot holders and the removable carbon fiber tool bag...

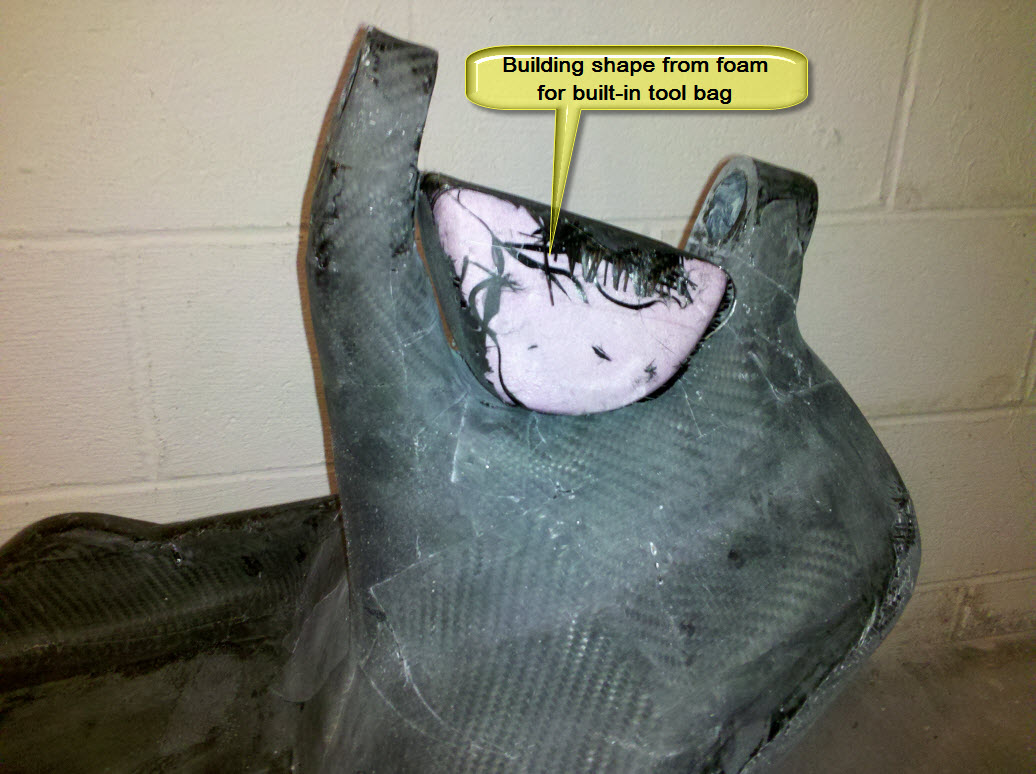
This is the rough carbon fiber tool bag -- after some sanding.  It fits well.  I will add some Velcro to hold it in place.   Hopefully it is large enough to hold an extra tube and a few tools.  I will split it into two parts with a 3" air cut-off tool.  The cut-off tool will breeze through the carbon fiber like butter.  BTW, I wear a respirator whenever I sand or cut carbon fiber. As well I have a ShopVac running normally to suck in the dust.   The carbon fiber dust is considered dangerous from what I have read.


Here is one of the foot-holders after applying an extra coat of epoxy, applying 50, 300, 600 and 1000 grit wet/dry sandpaper and rubbing on some wax...  It is not perfect, but I can live with it without losing sleep.


Monday, January 23, 2012

Punching holes through the carbon fiber... Disc brakes... Built-in tool bag

Holes

Well, not exactly "punching holes"...

During my 100 mile and 200 K rides, I often go through about 200 oz of water.  Therefore, in the design of the handcycle, I provided a couple of places to store the water in hydration bags.  (As a side note, I am fairly certain I will be building the bags unless I can find one with a small opening.)  One area is between the seat/bottom/rear wheel area.  The other is under the "U" shaped headtube support area.


(Thanks Dr. Lee for suggesting that I move the water more to the front in order to get better wheel traction.)


The two inline-skate wheel housing are now open from the bottom in order to accommodate the wheels...


Disc Brakes

The disc brakes that hang from the front and rear dropouts leave little room for error when fitting the actual disc that hangs from the hub (things that keep me from falling asleep quickly).  They fit!  That is, the holes through the dropouts (that are part of the frame),  exactly line up correctly to receive the disc brake housing, which exactly line up to receive the disc attached to the wheel hub... Thankfully!


Built-in Tool Bag

Sometimes, I just get tired of adding layer after layer of carbon fiber... So I building a tool bag now that is to fit in the "U" shaped headtube support. I always had the intention of doing this.  But I expected that I would have begun this part of the project later.


Friday, January 20, 2012

So how many layers of carbon fiber?

The calculation of the number of layers of carbon fiber is a guess on my part.  I have attempted to take into account some notes written by other DIY bike builders.  No matter, these calculations are "seat-of-my-pants" .
..And where does that term originate:


"Douglas Corrigan was described as an aviator 'who flies by the seat of his pants' today by a mechanic who helped him rejuvinate the plane which airport men have now nicknamed the 'Spirit of $69.90'. The old flying expression of 'flies by the seat of his trousers' was explained by Larry Conner, means going aloft without instruments, radio or other such luxuries."


Either way, we both crash if we are (were) egregiously wrong...  BTW, Corrigan did not crash, but instead landed in Ireland after crossing the Atlantic Ocean.  His original flight plan (rejected) called for him to travel west whereas he traveled east, and therefore, he became know as "Wrong Way Corrigan".  If I am wrong, I may become known as "Crash Chase"... oooops I think I already am...


Here are my intentions:


The "U" shaped head-tube area is about finished.  I need to add a couple of more layers in area of greatest depth of carbon fiber.  As well, the most of the front fork is finished sans a few layers around the head-tube. Presently I am working on the rear bike's dropout area and tail.  This is going better than expected since I am slowly gaining experience.  I have another layer to go on the bottom as well.  As previously mentioned though, adding layers of carbon fiber in flat areas and areas of larger curvature is easy as pie (blueberry in my case).

Wednesday, January 18, 2012

Changing method of laying up carbon fiber in complex curve areas...

Over the last few days I have been laying up carbon fiber around the "U" shaped holder of the headtube -- and I have a lot of layers there in my layup diagram.  The shape consists of compound curves which make the laying up of carbon fiber difficult.  The reason for this is that the stresses -- deriving from the front wheel and fork -- that must be handled by the shape, call for many layers of carbon fiber. I doubt that a mere four layers will suffice.  In fact, I intend to lay up about 10 layers on the shape.

Steerer Tube/Head Tube Area


The 2x2 twill fabric will easily lay down around the compounded curves. But the peel ply fabric, whether nylon or polyester, does not adopt to the shape as does the twill carbon fiber.  Therefore, the peel ply must be cut into smaller pieces as compared to the carbon fiber.  As well, darts have to be cut in the peel ply. In the end, I found that the "wet" carbon fiber/peel ply will shift and bunch. Additionally, since there are many pieces of carbon fiber due to all the curves of the shape, the possibility of having a perfect layup is nearly impossible.  Therefore, I decided to try a technique that I originally did not have a lot of trust in.  That technique is to use a spray adhesive (3M's 77 General Purpose Adhesive) to tack the carbon fiber in place.

The use of the spray adhesive greatly improves (seemingly -- more about that later) the layup characteristics of the carbon fiber.  It stays in place through the tortuous cycle of adding more carbon fiber, resin, and peel ply.  Additionally, since during a layup I have to put down quite a number of pieces of carbon fiber, I can take my time in doing so since I am laying up "dry" carbon fiber.

After laying the many carbon fiber pieces, I then apply a VERY LIBERAL amount of wet resin with West System's 206 Slow Hardner to the dry carbon fiber. I then push the resin through the carbon fiber with many, many dabs of the brush.  I use 2" cheap Chinese model brushes with about 1/3 of the length of the bristles cut off.  The reduced length of the bristles allow the brush to push the epoxy better as compared to a longer-bristle brush.

The slow hardner gives me about double the amount of time to work (pot life) as compared to the fast hardner (West System's 205).  For flat areas and large curves, I usually use West System's 205 Fast Hardener verses the 206 Slow Hardener that I am using in the above situation.

After the layup of the carbon fiber and the wetting down of it with the resin, I can then layup the peel ply (many more pieces) over the wet carbon fiber.  I brush and dab the peel ply until it is throroughly wet. This takes the predominate share of time relative to the working time of the epoxy.  Matter of fact, it is during this stage of laying up the peel ply where I find that most problems appear.  If the peel ply does not completely lay down, then I can feel pretty assured that a problem exists. The problem can be that:

  • The peel ply is stretched past a concave curve;
  • The carbon fiber is not saturated with epoxy;
  • And/or there is an air bubbles.

These problems have to be resolved quickly since the pot life of the carbon fiber may be near its end. For me, it is imperative that I have all the tools right at hand:

  • Peel ply cut to different widths and lengths
  • SHARP scissors (keep the scissor sharpener handy!)
  • Extra clean brush (if the pot life is ending, the brush becomes nearly unworkable, so a clean one may help for a few more minutes)
Additionally, I usually mix the epoxy resin and hardeners in small quantities (2 pumps on the West System's pump system). I rather have a multiple mixing sessions in order that I can continue to work longer since each mixing has its own pot life.


Of course, there is a hitch to this  dry layup.  If the carbon fiber is laid up on a dry surface and the epoxy resin is never worked into and through the surface of the carbon fiber to the surface below, then I could end up with a dry area without adhesion to the underlying carbon fiber.  This is really bad and the bike will almost certainly have failure problems.  From what I read, manufacturers of carbon fiber bicycles expect about 3% of the area covered to have problems of adhesion. I hope mine is less, but I really will not know unless I have a failure of the handcycle for which I would perform an autopsy.  At that point, I can cut away and determine if there are indeed dry areas for which plys of carbon fiber did not adhere to its neighbor.  

You might ask, "Why chance it?"  The reason is, the layup of "wet" carbon fiber on these curves proves to have other problems:

  • Shifting carbon fiber
  • Bunching of carbon fiber
  • Dry spots due to shifting and bunching carbon fiber.


For long curves, this is not a problem.  For instance, I layup a layer of carbon fiber over the entire bottom in very little time and with no problems. There will be almost no air bubbles or dry spots.  If so, they may represent a aggregate of maybe a square inch in size over an area that is probably three square feet -- or a quarter of 1%.

A few tips on laying out and removing the peel ply:

  • Always, if possible, keep some part of each peel ply in an area that is "dry" of epoxy.  When pulling the peel ply from a finished layer, you need to be able to grab a portion of the peel ply in order to remove it.  If the whole of the piece of peel ply is wet in the epoxy, on the surface of the carbon fiber, and if the peel ply is laying flat to the surface as it should be, then you will have headaches in removing it.  So keep some of each piece of peel ply dry.
  • When removing the peel ply, attempt to remove it as soon as you can.  For instance, do not wait a couple of days. I attempt to remove it after four hours with the 205 hardener and eight hours with the 206 hardener.  The epoxy is still "green."
  • Attempt to pull the peel ply as parallel to the carbon fiber surface as possible in order to not to disrupt the carbon fiber layers beneath it.  The peel ply sticks quite well to epoxy.  So when you pull it hard, you could dislodge to carbon fiber on a microscopic level.


So, for those that are interested in designing and building something out of carbon fiber, think about limiting the areas of small complex curves. Those areas require infinitely more time as compared to the larger curves and flat areas.

In total, I expect the above shape will take about 15 hours of work to complete in terms of carbon fiber layup.  But I may just be ssssslllllloooooowwww.....